Listen up. The grill is ready. The tongs are in my hand. And I’m about to share something that has been passed down from dads to dads since the invention of fire and backyard fences.
Grilling a perfect steak isn’t complicated. But it does require you to stop guessing, stop poking it every 30 seconds, and stop cooking it well done. This is critical. Trust the process. Trust the thermometer. Trust Dad.
Here’s everything you need to know.
Step 1: Pick the Right Cut (This Is Not the Place to Be Cheap)
The steak you choose matters more than anything else you’ll do at that grill. Here’s a quick rundown of your best options:
Ribeye. This is the one. Fat is marbled all through it, which means as it cooks, it basically bastes itself. The flavor is incredible, and it stays juicy even if you get a little distracted by the game. This is Dad’s go-to.
New York Strip. A solid, leaner choice. Great flavor, a little firmer. Good when you want something that feels a little more “refined,” like you know what you’re doing.
Filet Mignon. The most tender cut you can buy. Buttery soft, mild flavor. Great for impressing people. Pairs well with acting like you didn’t even try.
T-Bone / Bone-In Ribeye. Spectacular. Will take a bit longer to cook and requires your full attention, but the bone adds flavor and the presentation alone earns you applause.
Skirt / Flank Steak. Budget-friendly and delicious if you marinate them and slice against the grain. A hidden gem in the dad arsenal.
Whatever you pick, look for good marbling. Those little white streaks of fat running through the meat are where the flavor lives. And aim for steaks that are at least 1.5 to 2 inches thick. Thin steaks overcook fast, and nobody wants that.
Pro Dad Tip: Buy your steak from an actual butcher if you can. Pre-packaged grocery store cuts sitting under plastic wrap aren’t doing you any favors. A real butcher means fresher meat, better quality, and someone who will actually talk to you about what you’re buying.
Step 2: Let It Breathe (The Steak, Not You)
Pull your steak out of the fridge at least 20 minutes before it hits the grill. Room temperature meat cooks more evenly. Cold steak straight from the fridge leads to a seared outside and a cold, sad inside.
While it’s resting on the counter, pat it completely dry with a paper towel. Moisture is the enemy of a good sear. A dry surface = a better crust.
Step 3: Season Like You Mean It (But Keep It Simple)
Here’s where dads sometimes go overboard with the novelty spice blends. Don’t. Good beef doesn’t need a 14-ingredient rub. It needs salt and pepper.
Use kosher salt and coarsely ground black pepper, and use more than you think. Season both sides generously so the whole surface is coated. You’re not salting popcorn. You’re building a crust.
If you want to add a drizzle of olive oil before the salt and pepper, that works great too. It helps everything stick and promotes a better sear.
That’s it. If your steak is high quality, the beef does the work. Let it.
(Now, if you want to get a little fancy at the finish line, a pat of herbed butter on top of the steak right when it comes off the grill? That’s a power move. But it’s optional. You’re already winning.)

Step 4: Get That Grill Screaming Hot
This is where the magic happens, and where most backyard grillers go wrong.
Preheat your grill to 450-500°F. High heat. You want the grates ripping hot before that steak ever touches them. This is what creates the sear: that gorgeous, caramelized, slightly charred crust that locks in all the juices and gives you that steakhouse finish right in your own backyard.
Brush the grates clean, spray with a grill-safe non-stick spray or give them a quick rub with an oiled paper towel, and you’re ready.
Step 5: Grill It Right (Don’t You Dare Touch It)
Place your steak directly over the heat. Now put the tongs down. Walk away for a few minutes. I’m serious.
For a 1-inch steak: Grill 3-4 minutes per side over direct high heat. Flip once. Not five times.
For a 1.5-2 inch steak: Sear 3-4 minutes per side over direct heat, then move to indirect heat and let it finish cooking through. Fatty cuts like ribeye benefit especially from this method. It prevents flare-ups from torching your beautiful steak.
The steak is ready to flip when it releases easily from the grates. If it’s sticking, it’s not ready. Leave it alone. It’ll tell you when it’s time.
Step 6: Use a Thermometer (Real Dads Measure)
There’s a myth that real grillers just “know” when a steak is done by touch. Sure, maybe after 500 steaks. Until then, use a meat thermometer. It’s not cheating. It’s smart. And smart dads don’t ruin $30 steaks.
Insert the probe into the thickest part of the steak, from the side, not the top. Here’s what you’re looking for:
| Doneness | Internal Temp |
|---|---|
| Rare | 120-130°F |
| Medium Rare | 130-140°F |
| Medium | 140-145°F |
| Medium Well | 145-155°F |
| Well Done | 160°F+ |
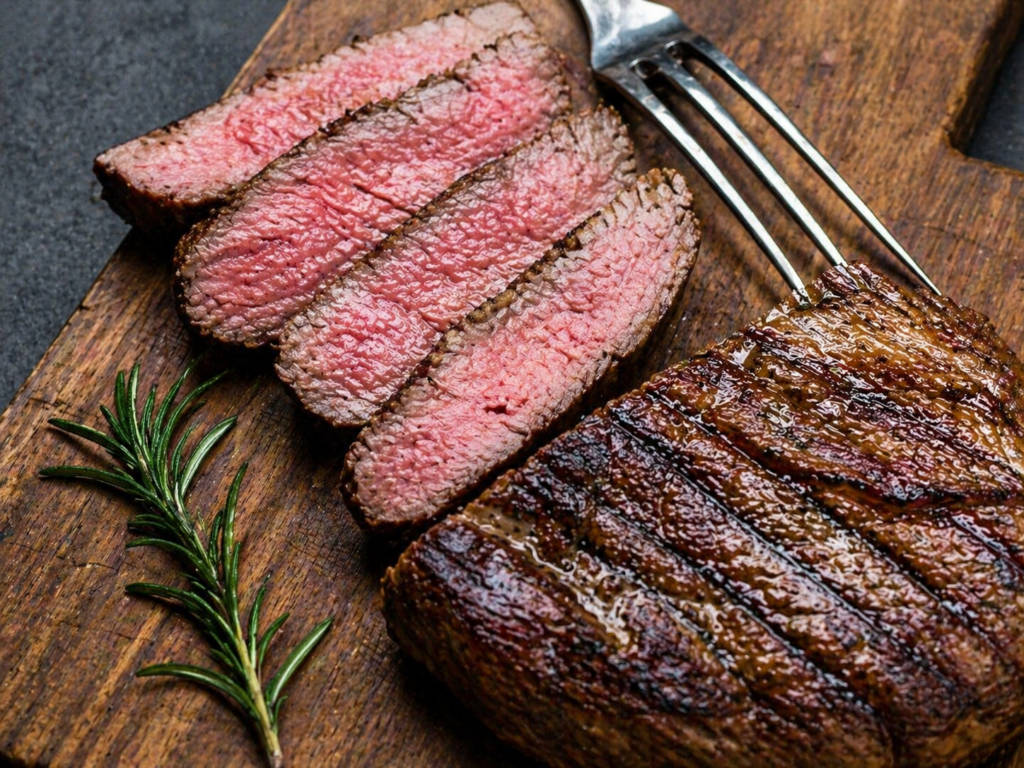
The sweet spot is medium rare. Pink in the middle, juicy throughout, maximum flavor. This is what steak was designed to be.
One critical note: pull the steak 5°F before your target temp. It will continue cooking after it leaves the grill. Account for that or you’ll overshoot every time.

Step 7: Let It Rest (This Is Non-Negotiable)
Remove the steak from the grill and set it on a clean plate. Do not cut into it. Do not let anyone cut into it. Cover it loosely with foil and let it rest for 5 minutes.
During this time, the juices redistribute throughout the meat. Cut too soon and all that juice runs onto the cutting board and is lost forever. Wait the 5 minutes. You’ve come this far.
While it rests, the internal temp will rise those final few degrees to your target. Perfect timing, every time.
Step 8: Serve It Up
Slice. Admire. Plate. Accept the compliments graciously.
If you went with a skirt or flank steak, slice it against the grain. This shortens the muscle fibers and makes it dramatically more tender.
A few great sides to round things out: a fresh salad with vinaigrette, grilled corn, roasted potatoes, or just more steak. Nobody’s judging.

Dad’s Quick-Reference Cheat Sheet
- Grill temp: 450-500°F
- Season: Kosher salt + coarse black pepper (both sides, generously)
- Sear time: 3-4 minutes per side over direct heat
- Target temp for medium rare: 130-135°F
- Rest time: 5 minutes minimum
- Best cut: Ribeye. Always ribeye.
There you have it. No complicated techniques, no fancy equipment, just the fundamentals done right. That’s the Dad Way. Fire up the grill this weekend and prove to everyone in the backyard exactly why you’re in charge of the meat.
You’ve earned that apron. Now go use it.